We support web subscriptions (subscriptions purchased through the web) and in-app purchases. Both of these are used as criteria for Access Control which federates access within the native article pages.
Paywall and Access Control
The Native app uses Access Control to federate access. There is no other way to federate content. Within Access Control, there are rule types for “App”. This is what the Native app will evaluate access against using asset information, meters, log-in state, and subscription services of the reader (or lack of). If access is denied a paywall will show.
Native paywall
A paywall will show after the content is restricted by Access Control. It has a headline and a subtitle. Below these two labels is a “Subscribe Now” button with a login button below. The headline and subtitle are controlled using Access Control offer groups. The Paywall headline and Paywall subhead are used as the copy on the native paywall. The “Subscribe Now” button is not changeable.
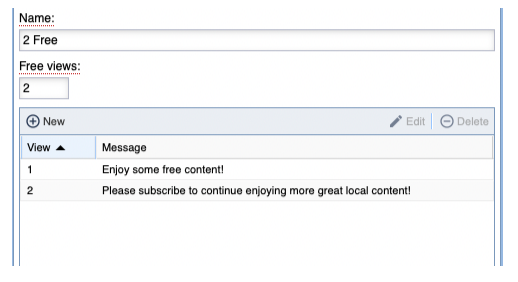
Meter alerts
When a meter is incremented to provide access to the reader you can optionally show a message to them to warn them of this action or use it as a way to convert them to a subscribe. When setting up a meter, messages can be configured to show on X number of views. This is controlled through the “Meter” when created in Access Control shown below. Only a description is needed for these meter alerts.
Subscriptions and in-app purchase
AppMan handles the setup of in-app purchases. You will need to configure each store with in-app purchase offers. Once completed the offer identifiers need to be added to AppMan and then published under a version.
Adding service within subscription for cross-site
Once the offer identifiers are entered into AppMan you will need to set up a service or services corresponding to each offer pair. For example, if you wish to offer monthly and yearly offers, you would have four offer identifiers (two for each platform).
- Click “Subscription” from the side panel. We need to create a service for each offer pair.
- If the right side panel is not showing, click the gear. Under services, click “New” and select the “In-App Purchase” option. You will see the new service panel.
- To create an in-app purchase service you will need to provide a name, an Apple and Android product id, and a rule profile. Enter a name in the “Name” field and then click “Configure” from the tab bar.
- You will see an option for “Apple Product ID” and “Android Product ID”. These are dropdowns containing the offer identifiers entered in AppMan. If no identifiers show up or the ones you are expecting then go back to AppMan and make sure the profile version is made live. Select the matching pair for Apple and Android. For example, I have an offer for a one-year auto-renewing subscription with an identifier called “oneyearsubscription0001”, for Apple, and “oneyearsubscription002”, for Android. I would select these from the dropdown.
- Click “Rule Profile” and select an existing rule profile to assign this service to then click “Save”.
- You will need to add the service to your method groups in Access Control to provide in-app purchase subscribers access to your content within the app. When the reader purchases an in-app purchase a subscription record will be created for the newly created service. This will grant them access to the web and the app according to your Access Control rules.