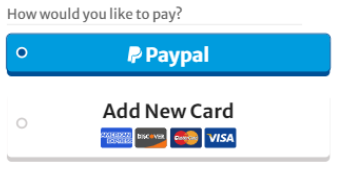
The ‘How would you like to pay?’ question on the 1-page purchase highlighting an example of the pay with PayPal button.
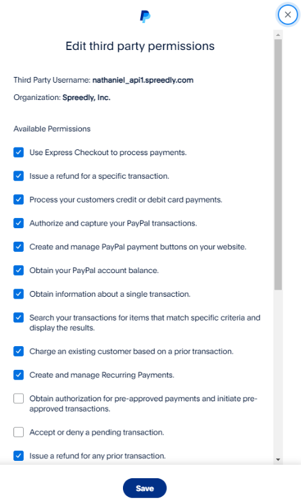
As described in step 7, the ‘Edit third party permissions’ setup.
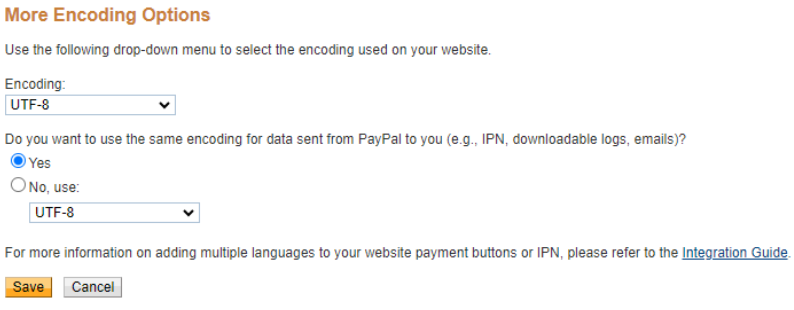
As described in step 12 and 13, the ‘More Encoding Options’ setup showing Encoding set to UTF-8 and Yes selected for the ‘Do you want to use the same encoding for the data sent from PayPayl to you’ setting.
As described in steps 17, 18, and 19, the ‘Instant Payment Notification (IPN)’ setup showing IPN turned on, Notification URL set to ‘https://core.spreedly.com/paypal/dev/null‘, and Message Delivery Enabled.
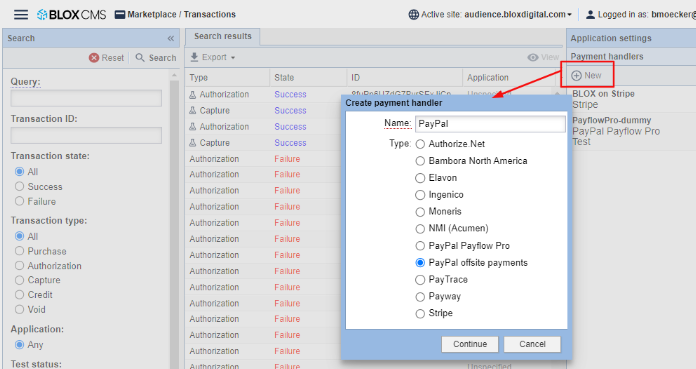
As described in steps 2, 3, and 4, the ‘New’ option under Payment handlers and the ‘Create payment handler’ UI showing ‘PayPal’ entered as the Name and ‘PayPal offsite payments’ selected for the Type.
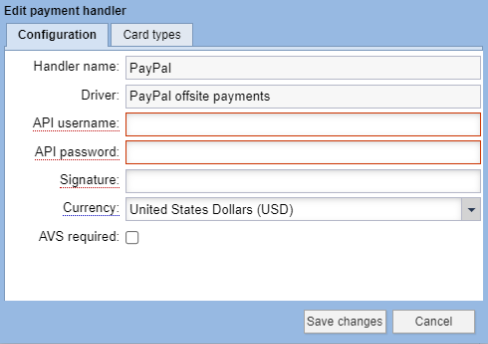
As described in step 9, the ‘Edit payment handler’ setup showing the ‘API username’, ‘API password’, and ‘Signature’ fields that need to be entered from PayPal.
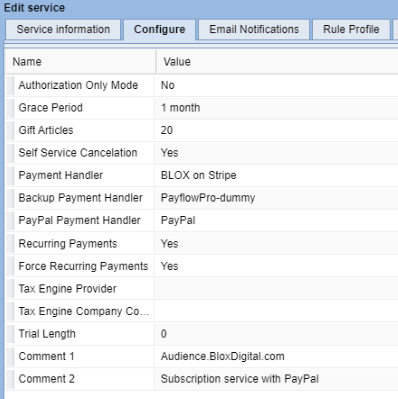
As described in step 4, the Configure tab of the your new Subscription Service should look something like this, depending on your settings and preferences.
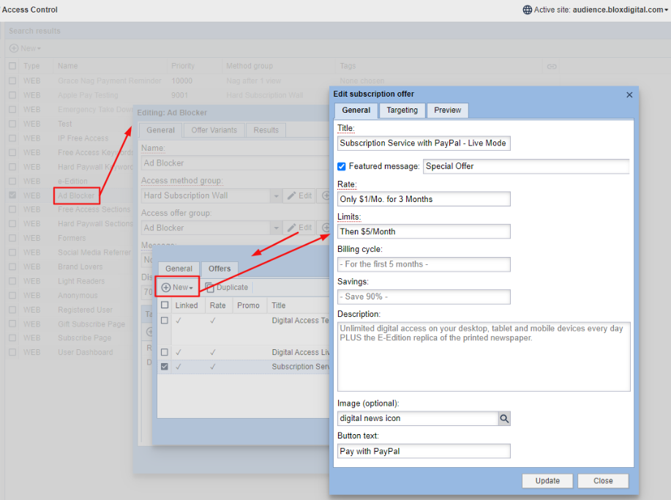
As described in steps 8 thru 21, an open Offer Group from the ‘Ad Blocker’ Rule showing the rate under the newly created Subscription Service named ‘Subscription Service with PayPal - Live Mode’ being added.
As described in step 24, an example of the 1-page purchase form with the PayPal button displayed.
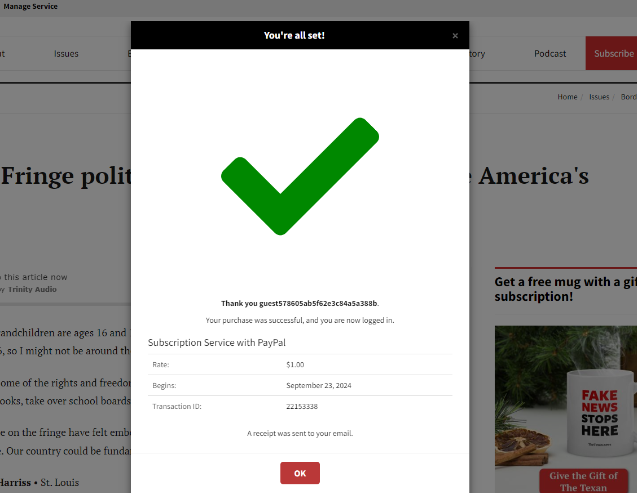
As described in step 26, an example of the confirmation indicating the purchase was successful.
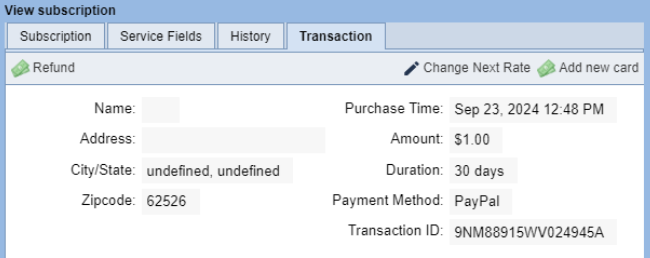
As described in step 28, the Transaction Tab of a Subscription Transaction showing PayPal Payment Method.
PayPal Button Setup
Introduction
Setting up the PayPal payment button on your website is an essential step in providing your readers with flexible and secure payment options. This guide is designed to help you through the process, but it's important to note that the majority of the setup and configuration must be completed directly in your PayPal account by you, the customer. Once your PayPal Business account is fully configured, our team can assist with the final step of enabling the PayPal button on your site and establishing its connection with BLOX Audience+.
As PayPal is the service provider for your account, they will be responsible for all ongoing account management and troubleshooting. After your PayPal integration is launched, any issues related to payment processing, account settings, or performance should be directed to PayPal's support team, who are best equipped to assist with their product. BLOX Digital will support you specifically in integrating PayPal with BLOX Audience+, ensuring your payment button works smoothly on your site.
How does the PayPal button work with BLOX Audience+?
The ‘How would you like to pay?’ question on the 1-page purchase highlighting an example of the pay with PayPal button.
When users select the PayPal button and tap the purchase button, they are redirected to their PayPal account to select their preferred payment method. After completing the payment process on PayPal's platform, the user is automatically redirected back to your website to finalize the transaction.
The subscription information is stored in BLOX like any other subscriber.
Setup Overview
There are multiple steps required to enable the PayPal button as a purchase option on your site. Please note that all steps must be completed in order.
Step 1: Verify BLOX Prerequisites
Step 2: Setting up a PayPal Business account
Step 3: Setup in PayPal
Step 4: Activating the PayPal button
Step 5: Testing the PayPal button
Step 6: Launch the PayPal button
Step 1: Verify BLOX Prerequisites
BLOX Audience+ and Wallet (Premium Credit Card Management) are required to use the PayPal button. Subscriptions Pro and BLOX Audience partners must upgrade to Audience+ and Wallet to take advantage of this functionality. Additionally, transactions must go through BLOX and use the 1-page purchase workflow, as this is where the PayPal button is enabled.
Setting up your PayPal Business account is a critical step that must be completed by your team, usually by your finance or audience department.
Important Notes
It is crucial to use accurate and up-to-date information when setting up your account to avoid any delays or issues with receiving payments. PayPal may require additional verification steps depending on your business type and location.
Familiarize yourself with PayPal's fees for different types of transactions.
The instructions below outlines the general process; however, BLOX Digital cannot perform this setup on your behalf. For any questions regarding these steps, please reach out directly to PayPal.
Go to the PayPal website
Navigate to PayPal's website (PayPal.com) and click on the "Sign Up" button.
Choose a Business Account
Select the "Business Account" option and click "Next."
Fill in details about your business, including: Legal business name, Business address, Business phone number, Business type, Business website, and Estimated monthly sales volume.
Provide personal information
Enter your personal details, including: Full name, Date of birth, Social Security Number (SSN) or Employer Identification Number (EIN).
Agree to the terms and conditions
Read through PayPal's User Agreement and Privacy Policy. If you agree, click on "Agree and Create Account."
Confirm your email address
Check your email inbox for a verification email from PayPal. Click on the link within the email to confirm your account.
Link your bank account
Log into your PayPal account and go to the "Wallet" section. Click on "Link a bank account" and provide the required information for your business bank account. PayPal will make two small deposits into your bank account. You'll need to confirm these amounts to verify your bank account.
The next phase of setup is enabling the proper permissions in PayPal so you can use the PayPal button integration with Audience+. These steps must also be completed by your team, usually by your finance or audience department. The guide below outlines the general process including how to Enable API Permissions, Confirm Encoding, IPN Notifications, and Sales Tax; however, BLOX Digital cannot perform this setup on your behalf. For any questions regarding these steps, please reach out directly to PayPal.
As described in step 7, the ‘Edit third party permissions’ setup.
As described in step 12 and 13, the ‘More Encoding Options’ setup showing Encoding set to UTF-8 and Yes selected for the ‘Do you want to use the same encoding for the data sent from PayPayl to you’ setting.
As described in steps 17, 18, and 19, the ‘Instant Payment Notification (IPN)’ setup showing IPN turned on, Notification URL set to ‘https://core.spreedly.com/paypal/dev/null‘, and Message Delivery Enabled.
Enable API Permissions - To begin, log in to your PayPal business account.
You’ll see organization Spreedly Inc. Spreedly is a third-party payment orchestrator that connects the BLOX CMS to your gateway. Nathaniel is the employee that set up the initial API connection.
IMPORTANT ⚠️: Check the boxes you see in the following screenshot to allow all of the necessary permissions:
Confirm Encoding - Go back to the Account Settings page.
On the left, under Products & Services, click the link for Website payments.
Look for PayPal button language encoding, and click Update.
On the Language Encoding page, click More options.
On the More Encoding Options page, set the Encoding to UTF-8.
Select Yes - use the same encoding for data sent from PayPal to you.
IPN Notifications - Go back to the Account Settings page.
On the left, under Business Profile, click the link for Notifications.
Look for Instant payment notifications, then click Update.
On the left, under Account & Security, click the link for Payment preferences.
Look for Sales tax, then click Update.
US Clients: If you wish to enable tax for PayPal purchases, click Add New Sales Tax and follow the prompts.
Canadian Clients: if you are using BLOX Digital’s tax solution, turn tax OFF to avoid double taxing.
Step 4: Activating the PayPal button
When all of the PayPal account setup has been completed in previous steps, you can proceed to Create a PayPal payment handler and Copy and paste your login information from PayPal into BLOX to connect BLOX to your account and enable the PayPal button.
📝 Note that the following steps will not work unless all previous steps have been completed. If you encounter any issues during this part of the setup, please go over the PayPal Account setup steps again. If your issue is not resolved, enter a support ticket with BLOX Digital.
As described in steps 2, 3, and 4, the ‘New’ option under Payment handlers and the ‘Create payment handler’ UI showing ‘PayPal’ entered as the Name and ‘PayPal offsite payments’ selected for the Type.
As described in step 9, the ‘Edit payment handler’ setup showing the ‘API username’, ‘API password’, and ‘Signature’ fields that need to be entered from PayPal.
Create a PayPal payment handler - In BLOX CMS, go to Marketplace > Transactions
Under Payment handlers, click New
Enter Name
Select PayPal offsite payments
Copy and paste your login information from PayPal into BLOX - In PayPal, click on your profile name, then click Account settings
Under Account access, look for API Access and click Update
Click on NVP/SOAP API Integration (Classic)
On the API signature panel, you’ll find your API username, API password and Signature.
Copy and paste those values into the corresponding fields in the BLOX payment handler
Click ‘Save changes’
Step 5: Testing the PayPal button
Now that all of the PayPal account setup has been completed and the BLOX PayPal payment handler has been created, you can proceed to testing.
As part of testing we’ll Create a new Subscription Service, Edit an Offer Group adding a Rate from the new Subscription Service, Test page that you just set up, Verify the transaction, Ensure auto-renewal is working, and lastly Refund the charges and hide or delete the Subscription Service.
As described in step 4, the Configure tab of the your new Subscription Service should look something like this, depending on your settings and preferences.
As described in steps 8 thru 21, an open Offer Group from the ‘Ad Blocker’ Rule showing the rate under the newly created Subscription Service named ‘Subscription Service with PayPal - Live Mode’ being added.
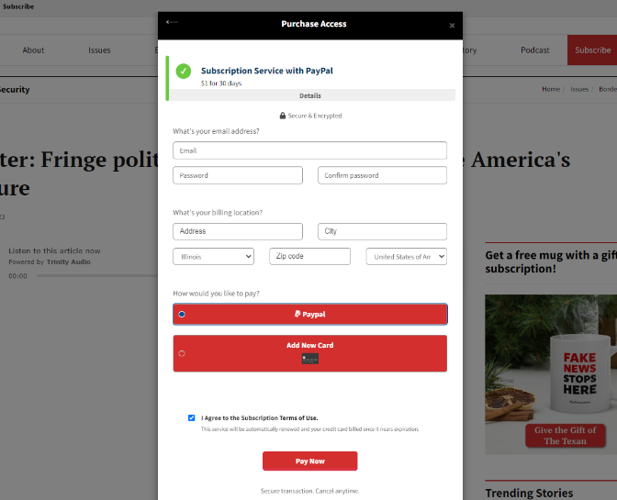
As described in step 24, an example of the 1-page purchase form with the PayPal button displayed.
As described in step 26, an example of the confirmation indicating the purchase was successful.
As described in step 28, the Transaction Tab of a Subscription Transaction showing PayPal Payment Method.
Create a new Subscription Service - In BLOX CMS, go to Community > Subscription
Create a new Subscription service and ensure all of the settings are the same as your other services.
In our example, we named the Subscription Service ‘Subscription Service with PayPal - Live Mode’
Make sure the service does NOT have the ‘Testing’ option checked.
Select PayPal in the PayPal Payment Handler field on the Configure tab to enable the PayPal button for this service
Select an existing disabled Rule Profile in the Rule Profiles tab. Do not create a new Rule Profile.
Add at least one Rate on the Purchase rates tab
Click Save
Edit an Offer Group adding a Rate from the new Subscription Service - In BLOX CMS, go to Community > Access Control
Open a rule that is inconspicuous or running on a test page
In our example, we’ve selected the Ad Blocker rule.
Click ‘Edit’ to edit the Method group
Click ‘Add’
Select the new test Subscription Service you created above
Click ‘Select’
Click ‘Save’
Click ‘Edit‘ to edit the Offer group
Open the Offers tab
Click ‘New’ to add a new Offer
Select ‘Start with a Rate’
Select a rate from the Service you just created
Since this is a test site, we have labeled our new service with ‘PayPal’ for convenience.
Click ‘Create’
Click ‘Save and close’
Click ‘Close’
Test page that you just set up - Navigate to your website and trigger the rule or test page above
When you click the offer purchase button, you should see the PayPal button as a payment option.
Using a live PayPal account with a live credit card attached, make a purchase as an end user.
You should be redirected to a PayPal screen to log in and/or choose your payment method.
Follow the prompts to be redirected back to your website.
You should see the checkbox indicating the purchase was successful.
Verify the transaction - In BLOX CMS, go to Community > Subscription
Find the transaction of the subscription you just created.
You should see the transaction of the subscription you just created, and the Transaction tab should show PayPal as the payment method.
Ensure auto-renewal is working - Navigate to the Subscription tab within the same subscription transaction.
Set ‘Expires’ date to “today” to test auto-renewal.
This transaction will be part of the auto-renewal process that occurs overnight. The following morning, you should see the subscription renewed and a new transaction was created.
Refund the charges - After the end-to-end purchase and renewal has been completed successfully, refund the charges and hide or delete the test subscription service.
Step 6: Launch the PayPal button
Congratulations! At this point you’ve setup the PayPal account, created the BLOX PayPal payment handler, and ran a successful test. You’re now ready to Launch PayPal on your live site by adding it to your existing Subscription Service(s)!
Launch PayPal on your live site - In BLOX CMS, go to Community > Subscription
Select PayPal in the PayPal Payment Handler field on the Configure tab to enable the PayPal button for your live Service(s)