
What are Push Notifications?
Push Notifications are automated, user opt-in, pop-up messages that are sent directly to a user's desktop browser or mobile device as an effective method of alerting users that latest news or information is available.
When a user engages with the message, the user is redirected to the full content for consumption. Push Notifications are an excellent method of contact for increasing user-engagement, as users can sign up and receive push notifications for the content that they care about. Push Notifications are currently supported on desktop and mobile browsers, as well as the BLOX Now app.
How do Push Notifications work?
BLOX CMS is built with Firebase, Google's mobile platform that provides the push technology. Google Firebase is free and only requires that users have an established Google account. The Push Notification setup is a two-part process that involves establishing a Firebase Project and then making a connection between BLOX CMS and Firebase. Once this connection has been made, Topics and Channels can then be created within BLOX Notifier.
Upon completion, desktop and mobile setups require that a notification sign up block be added to the BLOX site using the Utility: Notification controls block template.
BLOX Now app notification setups do not require a sign up block, as this functionality is natively available within the Now app Settings panel.
BLOX Notifier supports a single Firebase account (or Firebase project), so any Topics that are created will be available for sign up across desktop, mobile and BLOX Now app. BLOX admins who manage multiple BLOX sites may create multiple Firebase projects within the same Firebase account.
NOTE: Notifications will only appear in the notification panel if the user is on the site when the notification comes in.
There are off-site push notifications and on-site notifications. Off-site notifications are the notifications that you will receive when you're on a mobile device or when you're on a web browser but don't have the site open. These notifications don't interact with the notification panel in any way.
On-site notifications are the notifications that happen when you are currently on the website. These are the ones that do interact with the notification panel (ignoring them causes them to end up in the notification panel where they can be clicked or dismissed, etc). There is javascript that exists on their site to listen for notification events and then handles adding them to the panel, which is why if the site isn't open, it can't respond to the notification events, and they don't get added to the panel.
How to Setup a Firebase Project
The Firebase dashboard is located here:

To begin, click ‘Get started’ and then select ‘Get started with a Firebase project'.
Within Step 1, you'll be asked to enter a project name. When naming the Firebase account, be mindful and use a name that is relevant and reflects your site, business or organization and in most cases, not the name of a sole individual. We recommend the following naming convention: "domain.com Push Notifications"
Within Step 2, Enable Google Analytics for this project and then continue with the next step.
Within Step 3, select the Google Analytics account that should be associated with the new Firebase project. Choose Create project to complete the setup process. Upon completion, you'll be directed to the Firebase project dashboard.
Generate .JSON and Sender ID
Making the connection between Firebase and BLOX CMS is a quick process that involves generating a .JSON key within Firebase, noting the Sender ID, copying the Firebase configuration object code, obtaining the Web Push Certificate key pair, and then adding that information to BLOX Notifier.
To get started, click the Gear icon at the top of the left-hand menu and choose 'Project settings'.
Navigate to the 'Service accounts' tab and then click the Manage service account permissions link at the top of the page. A new Service accounts page will open in a new browser tab. On the right-hand side, beneath Actions, select the vertical ellipse option and then choose Manage Keys.
Select the Add Key option and then choose Create new key. This will populate a Create private key dialog where a .JSON key can be created and downloaded. Select the JSON radio option and then Create to initiate the creation and download of the .JSON key. The browser tab can now be closed after the download has been completed.
Go back to the ‘Project Overview’, click on the gear icon, and open ‘Project settings’. Select the ‘General’ tab and scroll down to the ‘Your apps’ section. If there are no apps in your project, click the ‘</>’ option within the ‘Your apps’ section to register a new app. Enter an ‘App nickname’, you can use the same name as the Firebase project. Make sure the ‘Also set up Firebase Hosting for this app’ is unchecked and click ‘Register app’. Select ‘Go back to Console’, scroll down to the ‘SDK setup and configuration’ section, select the ‘Config’ option, and copy the Firebase configuration object code displayed.
While still in ‘Project settings’, select ‘Cloud messaging’ tab, and scroll down to the ‘Web configuration’. Under ‘Web Push certificates’, click ‘Generate key pair’.
Within the Project settings, navigate to the Cloud Messaging tab and then copy the Sender ID. This will start tasks within Firebase.
Connecting BLOX CMS with Firebase
Within BLOX Notifier, populate the Application settings panel and navigate to the Push notifications panel.
Select the Upload option and locate the freshly-created .JSON key. Upon upload, the Google service role access file field will be populated.
Copy the Sender ID and paste it into the Messaging sender ID field. (You can ignore the "Google desktop notification API key" as Google has deprecated this).
Update the Firebase configuration object code removing the ‘‘const firebaseConfig =”, adding double quotes around each of the key names, and removing the semi-colon at the end. When finished, it should look something like the following. Copy that into the ‘Firebase Configuration’ field under ‘Push notifications’.
{
“apiKey” : "AIzaSyBWQf01MW7EPABc-bJFfmpYVOIlPBWQAD8",
“authDomain” : "example-push.firebaseapp.com",
“projectId” : "example-push",
“storageBucket” : "example-push.appspot.com",
“messagingSenderId”: "802311007947",
“appId”: "1:802300997947:web:545f9954a71799ac56781e",
“measurementId” : "G-7XWD40DNZL"
}
Copy the Web Push certificate key pair into the ‘Web Push certificate’ field under ‘Push notifications’.
(Additional setup step for NX apps: In addition to the general setup above, the NX app needs the JSON file to be set in Design > Apps > Application Settings > Google service accounts.)
Before the setup can be saved and completed, at least one Topic ID and Label will need to be created. The Topic ID is a considered a short name, while the Label is the actual name that will be presented to users within Push Notification sign up blocks and Now app Settings panel. We recommend starting with a basic push notification, such as Breaking News.
To the left-hand side of the Topic IDs and Labels is a Default checkbox. When this option is checked, the push notification will automatically be populated within push notification sign up blocks and Now app Settings panel. This option can be helpful when presenting multiple push notifications to users and allowing a primary push (such as Breaking News) to be automatically populated while push notifications for secondary topics (such as Entertainment and Sports) would remain unchecked.
Once all Topic IDs and Labels have been created, select the Save option to save the IDs, Labels and Firebase configuration. New Topic IDs and Labels can be added within this panel anytime, using the same Firebase configuration. Once saved, these Topics can then be targeted within either a new or existing Channel.
We recommend that Topics are assigned to Channels immediately after creation. If a Target has been created, but isn't associated with a Channel, users will be able to sign up for the Target but won't receive any push notifications until the Target has been assigned a Channel.
(Additional setup step for NX apps: In addition to the general setup above, the NX app needs the JSON file and Sender ID.)
Utility: Notification controls Sign up block
Notification Topics can be presented to both desktop and mobile users by introducing a notification sign up block to the page layout using the Utility: Notification controls block template.
This block offers two Presentation styles:
Stuck to bottom: This style displays the block just above the page footer.
In the Nav: This style displays the block within the site navigation.
The Utility: Notification controls block should be placed within a header region, such as main-nav-right-region. When getting started with push notifications, we recommend that this block be placed within a test section before making it available to your audience. This will grant the opportunity to sign up and witness the user experience firsthand and make any necessary refinements.
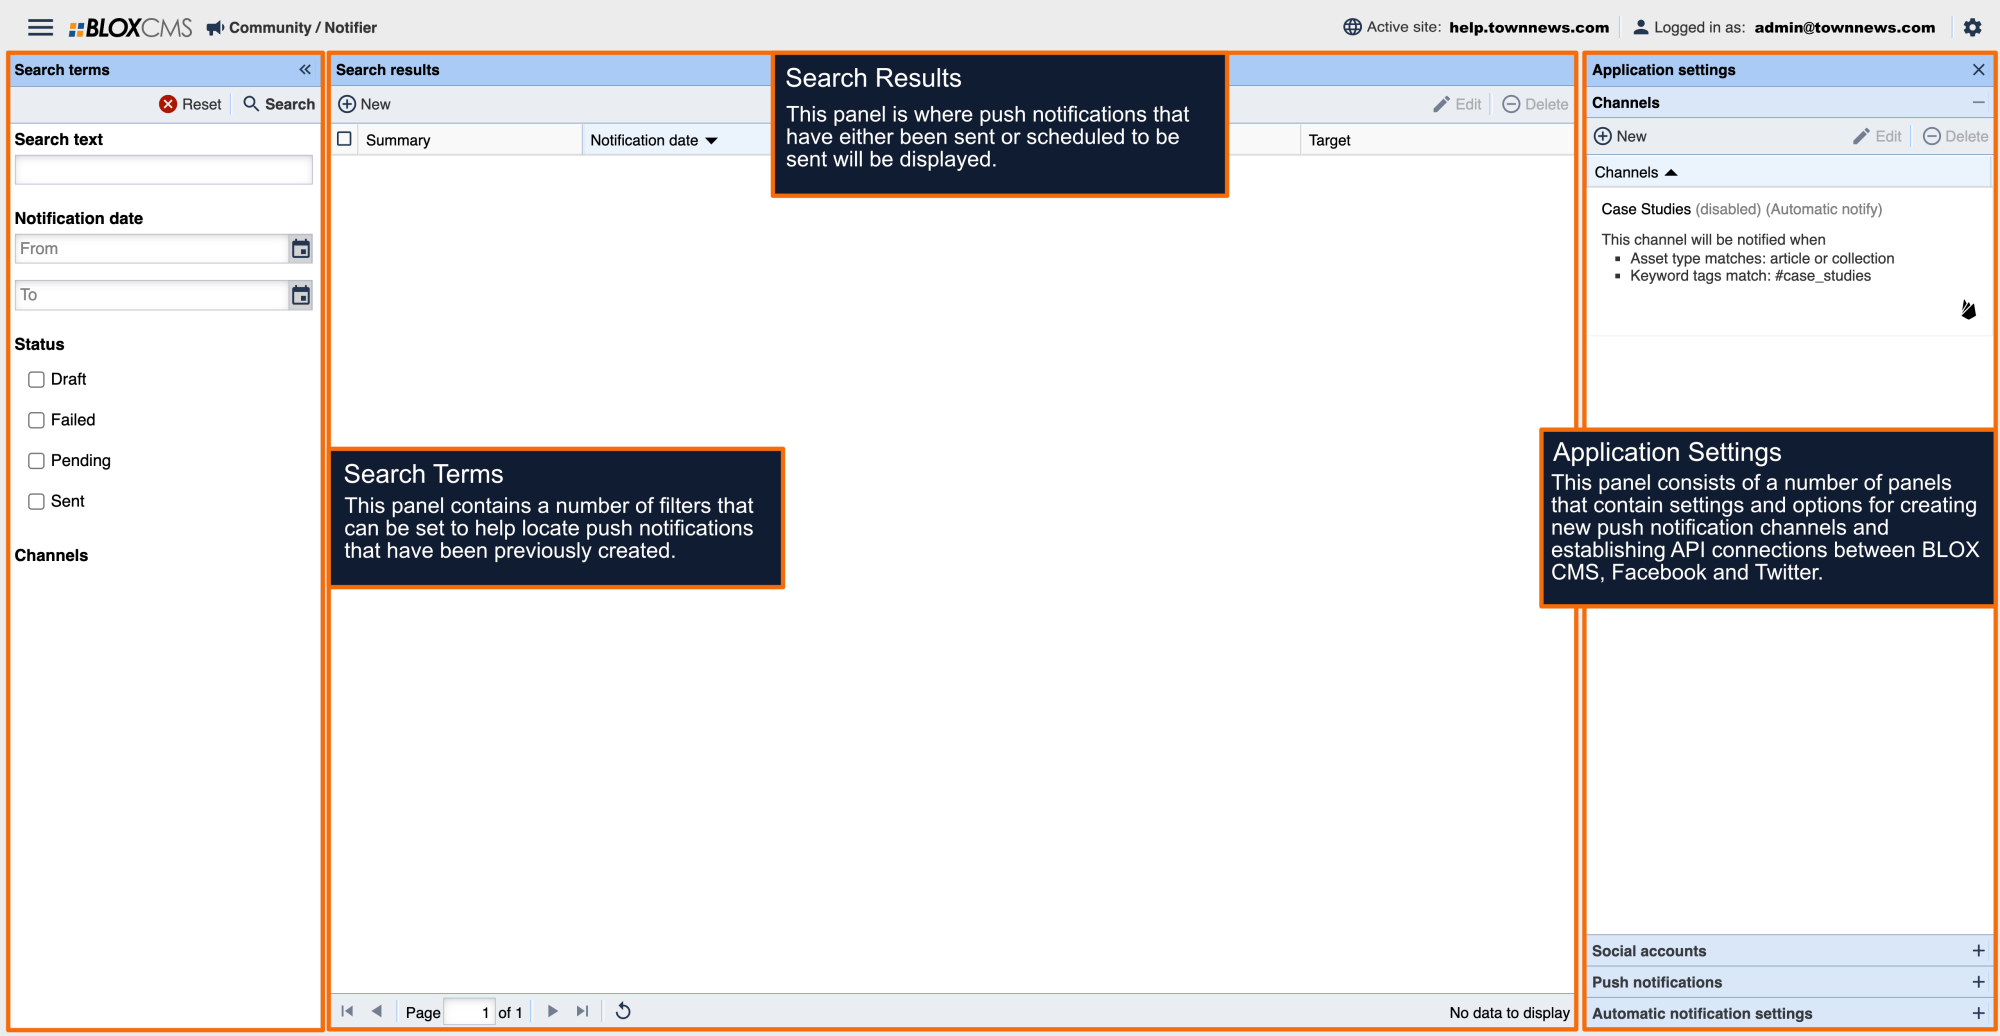
How to manually send a push notification
If the need arises to bypass the automatic notification rules, push notifications can manually be sent from either BLOX Notifier or within the actual asset itself.
To manually send a push notification within BLOX Notifier, select +New within the Search Results panel. Next, within the Create new message window, use the search tool within the Notification message target panel to find the asset that you'd like to push. Once selected, the Message field will populate with the asset title. This can be overridden, as well as the Title of the push. The publication date/time are included. If the asset features a future publication date/time, the push will go out shortly thereafter that date/time. If the publication date has already passed, the push will be pushed out within a few short minutes.
Within the Channels panel, select the Channels that should receive the push notification and then select Save and send to complete the push notification. Push notifications may also be saved a draft for future delivery.
To manually send a push notification within an asset, navigate to the Other tab and then to the Notifier panel. Select +New to populate the Create new message window and then follow the same steps that were used for manual pushes within BLOX Notifier.
How are push notifications tracked in the BLOX Now app?
We originate our push notification from the “Notifier” in the BLOX CMS. This is connected to Firebase and Firebase pushes notifications on Apple and Google platforms. Due to the origination of the message being in BLOX, Firebase does not pick up individual messages and track performance see below for how GA tracks this information. Firebase gives you overall numbers but keep in mind due to Firebase working out bugs in the reporting, there are discrepancies for IOS. Apple and Google continue to work on better reporting for Firebase for IOS.
Due to Google's EOL of the Google Analytics 3 platform, Now app analytics have changed to GA4.
How are push notifications tracked in the BLOX Mobile NX native app?
Our help article for Mobile NX app analytics includes a section on available app analytics, please scroll down to "Push notifications and messaging".