


This article details how a broadcast station user can create a video item from a video capture box that is sending a video feed to the Blackbird editor.
Blackbird is a real-time cloud-based editor. It accesses video captured by the Blackbird edge server installed at your location. Blackbird maintains an archive of 24/7 video that you can access to create video clips. Clips are transcoded to web-ready format, and the transcoded files are typically stored in BLOX VMS.
Workflow: Quick Summary
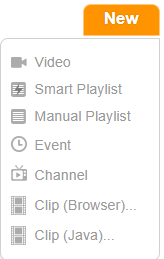
In BLOX VMS, find the New button in the upper-right corner and select Clip (Browser)... to open the Blackbird editor for your account.
- Find the source hour in Files window and open by double-clicking.
- Locate and select the In and Out Points for the video clip.
- If you need to make further edits, drag the clip from the blue (left) source window to the orange (right) editing window. Otherwise, skip to step 6.
- Click the title in the orange window to give the video a helpful title.
- In the orange window, find the frame that will be used for story / thumbnail image, and leave the cursor there.
- Drag the completed clip from the window in which you are working and drop on the BLOX VMS button. Fill out the extra metadata.
The item will appear in BLOX VMS after you drop it on the BLOX VMS button.
Workflow: Expanded Version
In BLOX VMS, go to New > Clip (Browser)...
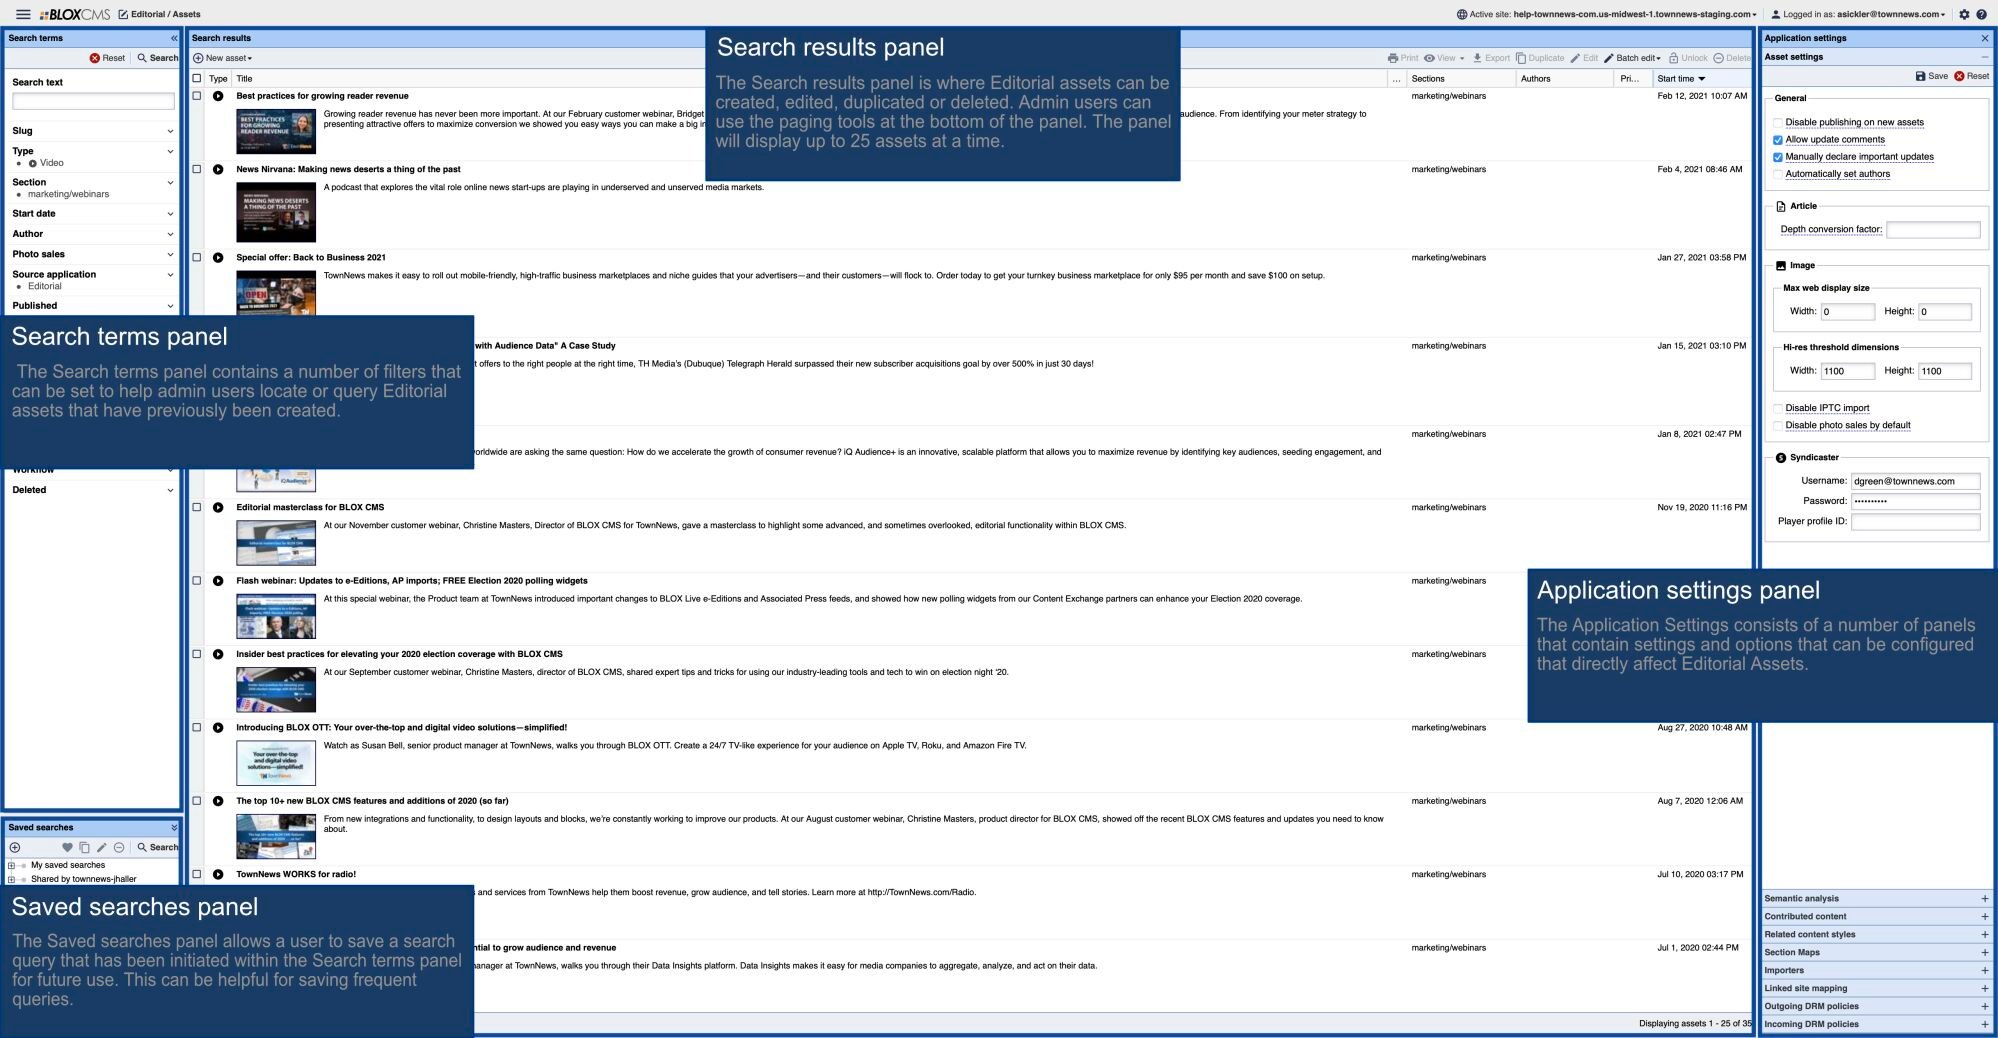
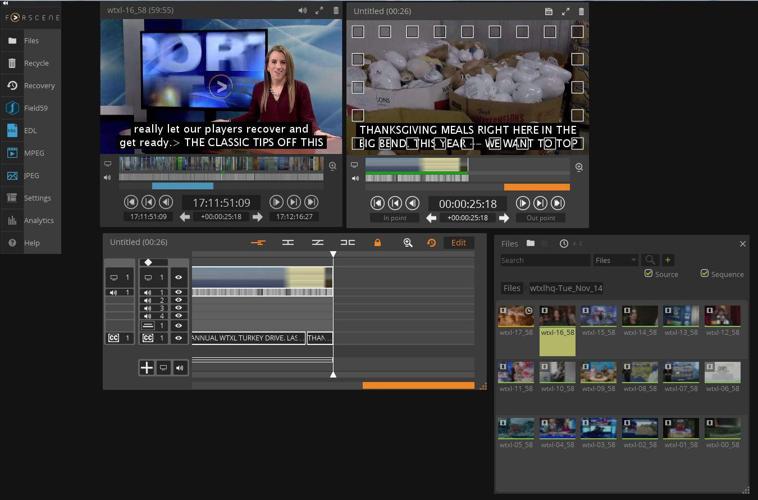
After Blackbird loads, you can move all of the windows around within the Blackbird interface.
The window at top left (with blue accents when a video is selected) is where a user can preview the source video being recorded by the Blackbird edge server. Users can submit clips directly from this window if In/Out points are set and no additional editing between the In/Out points is needed. The window to the right (with orange accents when a video is selected) is the editing window. This is where a user can preview and edit a clip after clipping it from the source if additional editing is needed.
Below those windows is the editing timeline. This is used to change the order of clip components and do other editing, including closed caption editing. If a user is just making simple clips without doing much editing, this will not be used much. Users can, however, click and hold on the Edit button and change it to the blue Log. This will show you the closed caption data, if available. The caption data is searchable, and users can double click on the In and Out times to jump to that point in the source file.
The Files window contains recent days of video ingested by Blackbird. You can also make your own folders to store your raw clips or edited video if you wish.

On the left of the screen is the Menu. The upper left button shows a file icon – this brings up the Files window in case you close it.
Next is a recycle bin icon – use this to delete old files from the Files window.
Below these is Recovery. This will open a window of auto-saved/recovered files.
Next is the BLOX VMS button. Left-clicking on the BLOX VMS button opens a list of clips that have been submitted for transcoding to either button. The BLOX VMS button allows you to pre-populate BLOX VMS metadata when submitting a clip.
Left-clicking on the "JPEG" button opens a list of frames submitted to be exported as JPEGs.
Last is a button with a question mark. This will lead you to help documentation and training videos (please note not all Blackbird features in their documentation are available as part of the BLOX VMS integration).
In the Files window, find the day you want to clip video from and double-click it to open its folder. A window will open with each hour of the day listed as its own file. The hours are listed in a 24-hour format, localized to your time zone. Double-click on the hour you want to clip from. (Note: these files may set to begin each hour a couple of minutes before the actual top of the hour, in case you are sending newscasts that begin a bit earlier.) The hour you selected will open up in the left-side window.
The left-side window has standard video controls. To either side of the main timecode are buttons that will take you back or forward one frame. Outside of those are buttons that will take you to the beginning or ending of the clip. On the very outside are buttons that will go to the very beginning or very ending of the whole hour. Below that are indicators of the “In Point” (mark-in) and “Out Point” (mark-out), as well as buttons that will take you directly to the In and Out Points if you’ve already made them. If you type a time in the center on the bottom row, you’ll instantly move to that point within the clip. In between these controls is a field that will tell you the length of your selected clip.
Above the timecode is the “Navigation Bar.” The color bands relate to the video frames during that time. Use the scroll wheel to zoom in and out. You can click on it to move to that frame or click and drag to shuttle through the video. (Note: zooming in is a great way to get to the very first frame of a shot or to see the exact transitions between shots.)
Find the beginning of your story. This can be done four different ways:
- Click on the video window or press the space bar to begin watching the video clip.
- If you know the time the story aired, enter that in the timecode field.
- Navigate manually through the navigation bar.
- If closed caption data is available, click and hold on the "Timeline" button to change it to the blue Logging window. Search on the caption data, and double click on the In and Out times to jump to that point in the source file.
Once you’ve found the beginning, click on the In Point button. The In Point time appears to the left.
Do the same thing to find the end of the clip and then click on the Out Point button. To preview your clip, double-click on the In Point time to jump to the beginning and click the video frame once to play.
When you’re satisfied with the In/Out points, using the navigation bar, find the frame you want to appear as the story / thumbnail image with the video. If you have closed caption data in Blackbird, determine if you want to publish the file with the captions included. Drag the clip from the source/blue window to the BLOX VMS button on the left of the screen and release. Populate Title, Summary, Description, Category, and Tags, then hit "Ok." The clip is now being rendered from the edge server, transcoded and transferred to your BLOX VMS account.
Here is a video demonstrates the above process of making a clip from a longer source file:
If you need to make further edits to the clip beyond just mark-in/mark-out, click and hold onto the video frame and drag it from the source window over to the orange window on the right. This is the editing window. On the top of this window, you’ll see the default title, “Untitled (00:00)” with the length of the clip listed within the parenthesis. Give the clip a title. Using the navigation bar, find the frame you want to appear as the story / thumbnail image. If you have closed caption data in Blackbird, determine if you want to publish the file with the captions included. Finally, drag the clip from the orange window to the BLOX VMS button on the left of the screen and release. Populate Title, Summary, Description, Category, and Tags, then hit "Ok." The clip is now being rendered from the edge server, transcoded and transferred to your BLOX VMS account.
Go back to the BLOX VMS Manager and refresh, you'll now see your clip "in progress".
JPEG Publishing
You can also generate a single frame from your broadcast video if you wish to use it elsewhere in your CMS.
If you already have a clip in the orange window in Blackbird, name the clip, find the frame, then drag it to the “JPEG” button. If the desired frame is in another part of the raw video, you can also find your frame in the left/blue source window, and then drag it to the “JPEG” button.
This will open a window in a browser similar to the published clips window. Right-click it or the link below and save it to your computer.