


This article provides instruction on publishing BLOX VMS video on demand assets in BLOX CMS, including creating video content via the content syndication feed within the CMS.
This article includes 4 sections:
- Uploading videos from the CMS to be stored in the VMS
- Setting up a BLOX VMS syndication channel in BLOX CMS
- Adding video content via a BLOX VMS content syndication feed
- Automatically adding videos using an importer
Uploading videos from the CMS to be stored in the VMS
Most simplistically, users with a BLOX VMS account can continue to manually upload videos using the BLOX CMS video asset. The videos will be stored and served in BLOX VMS, ensuring that video consumption by your end viewers does not consume CMS bandwidth but instead your separate VMS allotment.
To check if your CMS site is configured for direct CMS upload to BLOX VMS, go to Settings > BLOX VMS Video Upload and verify your BLOX VMS account is specified. If you do not see a BLOX VMS Video Upload settings panel, contact support to get this enabled (requires additional software privilege to be installed).
Setting up a BLOX VMS syndication channel
To enable the ability to create or add video content via a syndication channel, you will first need to setup your BLOX VMS content syndication channel. This is a one-time setup. If you already see a BLOX VMS channel configured in Syndication, you're already set to add videos -- skip down to the next section of this article.
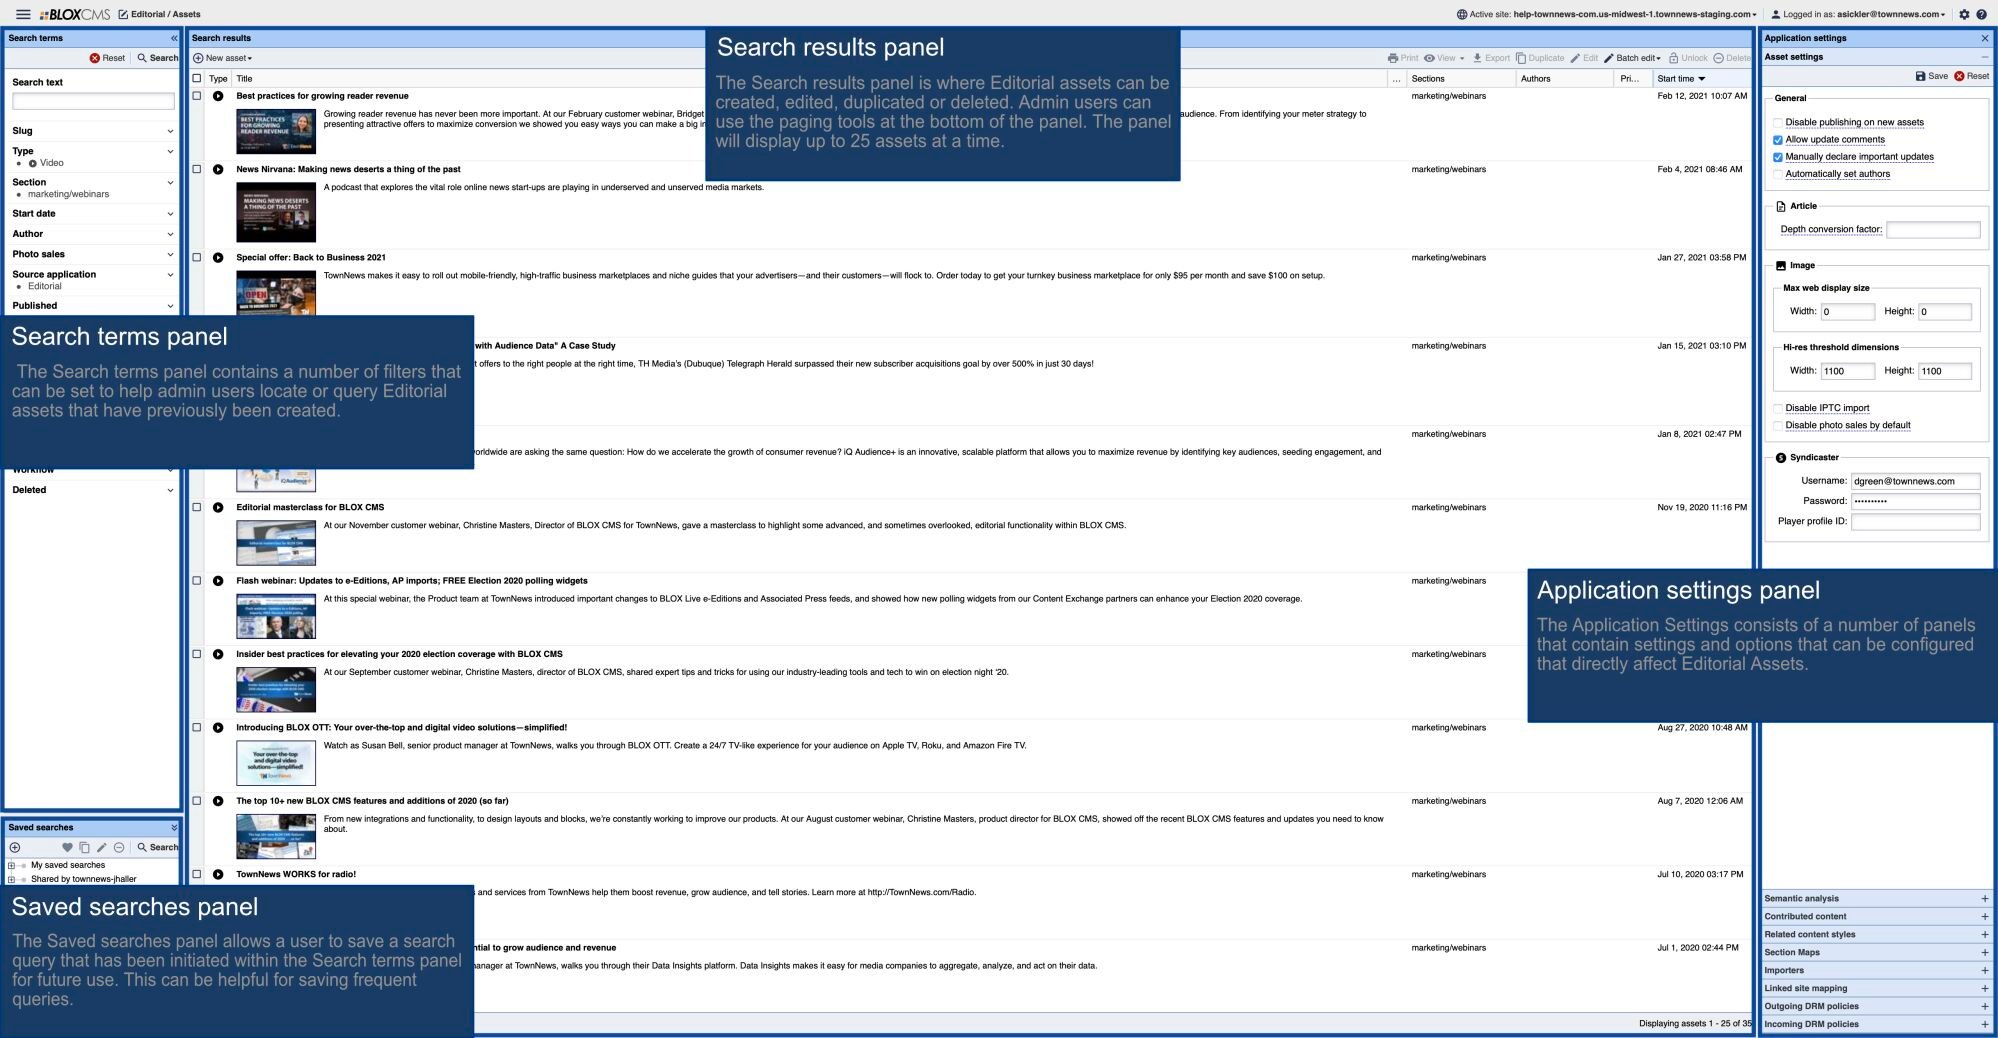
From the drop-down in the the upper left choose Editorial -> Syndication.
Open Application settings by clicking the gear icon in the upper-right corner of the admin desktop.
Click on New.
Click on BLOX VMS and click Continue.
Provide a Channel name, a BLOX VMS username and password (note: you may want to create a specific BLOX VMS user that is not associated with a specfic employee), and optionally select a Workflow (if applicable — newsrooms using a Workflow would allow video assets created through this channel to be managed within an existing newsroom workflow process). Finally, click Save.
The syndication channel should immediately appear with video content from your BLOX VMS account.
Adding video content via syndication
Once the syndication channel has been created, you are ready to begin adding video to your website. Videos are added as BLOX CMS video assets, and can be added directly to your site or attached as related content to a new or existing article asset. If you are publishing assets to the VMS direct from CMS as described earlier in this article, you do not need to add any of those assets to the site because they already exist on the site.
Direct Manual Publishing
To import a video and add it to your site, navigate to your BLOX VMS syndication channel. From the drop-down in the the upper left choose Editorial -> Syndication, then select the channel from your list of available channels.
Your BLOX CMS site may already have an importer set up to automatically import all videos available in your BLOX VMS channel. If not, you can manually import them. Check the box next to the video you wish to import, then click Add to site in the top-right corner of the panel. Alternatively, you can right click on the video to display an overlay menu, or double-click the item to load the video in the video asset editor panel.
Select Add to site to create a video asset. The metadata you provided when the video was created in BLOX VMS will automatically be carried with the video. Once created, on the video asset editor panel you can change any of your metadata, such as the title, description, targets, etc. for the video. You can also play the video inside BLOX CMS.
Adding video as related content
One way to add a video as related content to an existing article asset is to add it from the Syndication channel. Open the article asset to which you wish to add video, click on the Related tab, then Add, and select From Syndication from the drop-down menu.
Choose your BLOX VMS syndication channel from the list of available channels, check the box next the video you wish to add, click Import and add, then Add to asset.
When saved, the system automatically attaches it under the related tab. Once added as a related item, right click the item to reorder or edit the video asset.
If the video has already been imported and is already a video asset in BLOX, click on the Related tab, then Add, and instead of From Syndication, select Find assets from the drop-down menu. Filter your search by Type to Video to show your videos, which will by default order by most recent. Select the video(s) you want to relate, and click Add Selected assets.
Automatically adding videos using an Importer
One other option you may want to utilize once you have created your BLOX VMS syndication channel is to set up an importer to automatically create video assets. This may streamline your workflow by allowing you to not have to go to the Syndication channel and click “Add to site” each time you want to associate a video with an article, or publish a video to a given section. The importer runs every few minute and adds any new videos that match the defined search criteria for the importer. You may already have a BLOX VMS importer or importers set up for your site. Go to Application settings and click on Importers to review if any importers already exist.
From the drop-down in the the upper left choose Editorial -> Syndication. Open the BLOX VMS channel and set the search you want to be automated. If you do not define a search, the default importer you create below will bring in all assets in the BLOX VMS account (except for any videos that may have been natively uploaded to the CMS as described earlier in this article; those assets already exist in the CMS and do not need to be imported).
Open Application settings by clicking the gear icon in the upper-right corner of the admin desktop.
Then click on Importers and locate your BLOX VMS Syndication Channel. Click New to create a new importer for your current search.
You can set videos to automatically target to a specific section, or add particular flags or keywords to the BLOX assets that are created, if desired.
You can have multiple different importers as needed to apply the correct CMS properties for a given type of video content.
To update an existing importer, you can right click on the importer and select Update from current search. This will change the importer to use whatever you currently have defined in Search terms on the left hand side of the screen (if you are not sure what the importer's existing search is, choose Set as current search to load the currently defined search into the Search terms area on the left, then review and use Update from current search as needed).
Learn more about importers in our Content Importers article.